Release Notes for MeasureSquare 8
UI Improvement
-------------------------
1. Enhanced the Project Items, it now shows Net Area, Cost Amt, Sales Amt, Profit. Right-click on the headers to select columns and reorder them.

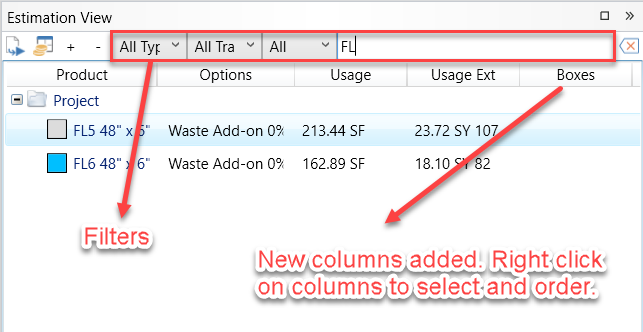
2. Enhanced the Estimation View
a) it now shows the usage and amount columns as Project Items.
b) Provided the ability to filter products.
c) The columns can also be selected and sorted.
d) Double click on the product to view its details.
e) Click on the headers to sort.
3. Enhanced the Room View to search rooms by name.

4. Improved Copy/Paste
a) Press Ctrl+C to copy selected items under Product/Service, Project Items, Estimation View and Room View, can either be pasted as plain text or as tables into Excel.
b) Worksheet items can be copied and then pasted as plain text or as tables into Excel.
c) Make most texts under Property View/Worksheet selectable and copyable.
5. Progress is now shown in the taskbar. You can right-click on the progress window to toggle it off.
6. In the worksheet, Margin/Markup/Profit of the worksheet by types is shown in the right panel. "Show Amount of Selected Group Item" option is provided under the "Cell" button.
-------------------------
Tile Estimation
-------------------------
Tile/Hardwood "Waste Add-on" Calc Method is meant to get the rough usage by its percentage in a tile pattern, but together with cutting/sawing in tile pattern and tile replacement, the "Waste Add-on" calculation can be a little complicated, we did some modifications to it to make it more applicable.
1. If a "Waste Add-on" tile/hardwood is cut/sawed in a pattern, each cut/sawed piece in the pattern is now calculated as a whole tile/hardwood to get its percentage. (It tends to overestimate the cut/sawed tiles in a pattern)
2. If a "Waste Add-on" tile/hardwood replaces or is replaced by others tile, its usage increment/decrement is now calculated by the actual replacing/replaced region in the diagram. (It tends to underestimate the usage of the replacements.)
-------------------------
Estimation Warning
-------------------------
It will detect the following four kinds of warnings and errors:
1. There is at least one abnormal cut in the cut sheet.
2. For some reason, a tile pattern in the project is invalid.
3. A base perimeter/corner count add-on is attached to a tile which is not the first tile in a tile pattern.
4. A random tile pattern contains a tile whose Calc Method is one of Half Reuse/Cut and Fit/No Reuse.
5. A "Waste Add-on" tile is cut in a tile pattern, each cut piece in that pattern is calculated as a whole tile.
6. A "Waste Add-on" tile is replaced in the diagram, the estimation may be inaccurate due to the implied conflict between "Waste Add-on" and Tile Replacement.
-------------------------
Others
-------------------------
1. Fixed tile replacement bugs: in some cases, tile replacements outside of the floor were not removed.
2. Fixed a miscalculating of product usage per room.
3. Improved performance and stability.
4. Updated the license agreement.
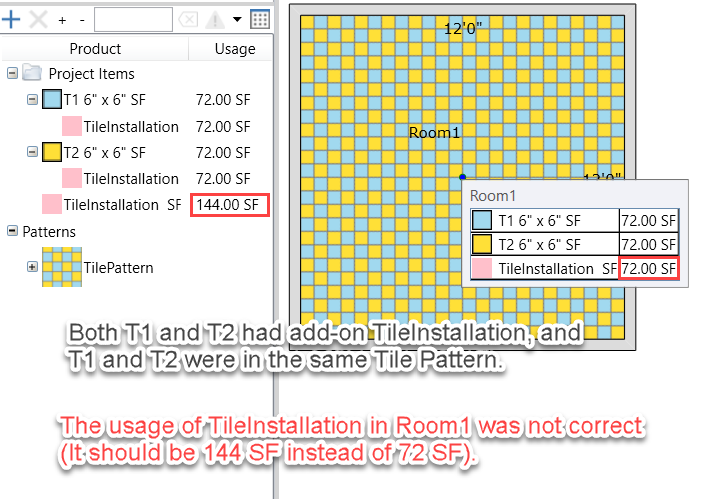
1. Fixed an estimation bug of tile add-on: when there were two or more than two tiles in a tile pattern and they all had a same add-on product, the usage of the add-on product in rooms was not calculated correctly.
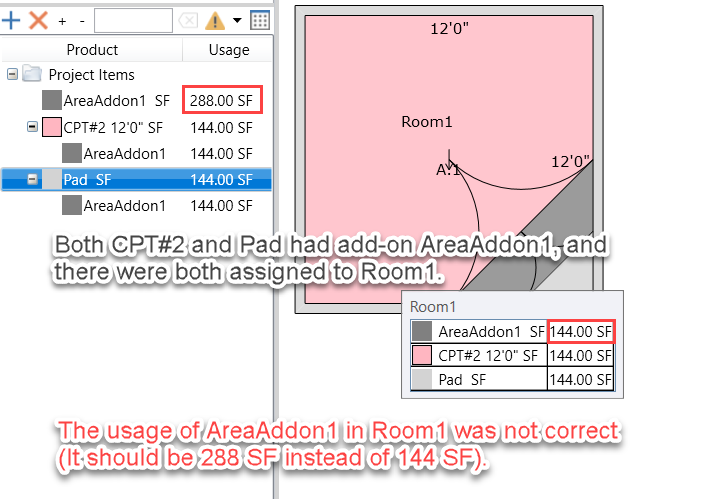
2. Fixed an estimation bug of carpet add-on: if an add-on product was associated to a Carpet and a Pad, and the Carpet and the Pad were assigned to a floor at the same time, the usage of the add-on in that room was not calculated correctly.
1. In print settings, provided "Sales+Tax Subtotal in Forms" options, to subtotal Sales+Tax amount of grouped items.
2. Improved the performance of the cut sheet view operations for big projects.
------------------------- Bug Fixings -------------------------
1. Self coving didn't work for some divided regions.
2. Project items sorting didn't work as expected when there were products not in use.
3. Fixed a signature display bug in printing.
1. Fixed a MeasureSquare PDF Printer accuracy issue: Diagram drawings (especially the tile patterns) didn't align with the floorplan.
2. Reduced the file size of the MeasureSquare PDF Printer when printing room photos.
3. Improved the performance of the MeasureSquare PDF Printer.
4. Improved the responsivity of the print window.
------------------------- Worksheet -------------------------
1. Fixed a bug in merging items. If the main product's price was zero and the addon product was not taxable, the merged item would get a wrong tax.
------------------------- Plan Import -------------------------
1. The floorplan can be cropped by drawing a free polygon, either in the diagram context menu or in the Image Preview Window. (Crop images with angles)
2. A floorplan can be Send to Back/Bring to the Front. (Send bigger image behind small image if overlapping)
3. Fixed a floorplan drawing bug if two floorplans were imported with the same file name but different image types.
4. Fixed a floorplan copy/paste bug: if a floorplan was copied from a second instance and the second instance was closed, it could not be saved.
------------------------- Segments -------------------------
1. Segments can be split by the "Split Wall Segment" command. (Split one long segment line into smaller pieces)
2. Connected segments outside of rooms can be merged by the "Merge Rooms" command. (Merge multiple segment lines into one) 3. The start and end section of a segment can be deleted independently.
4. Multi-Segments outside of rooms can be moved together now. (Batch move)
------------------------- Alignment -------------------------
1. It allows aligning on the center of an arc line.
2. It shows the center of an arc when the mouse is over the arc.
3. Enhanced the alignments when drawing or dragging a segment.
4. Alignment on a point is shown as a thicker circle. Tip of drawing a precise free-draw tile:
1. Use alignment to draw segments in the diagram.
2. Draw a room by alignments on the segments.
3. Right-click on the room to "Export Polygon" to get a MeasureSquare Polygon file.
4. Import the file in the tile polygon drawing window.
------------------------- UI Improvement -------------------------
1. In the Product/Service panel, click on the column headers to sort “Project Items” by name, usage or waste.
2. In the Room View Panel, click on the column headers to sort rooms by name, area, perimeter or usage. -
------------------------ System Setting -------------------------
1. Linear Product Drawing width can be set as an individual width or a shared width. (Uncheck the box to make linear products thicker/more visible)
2. Hit-test Tolerance can be set to make it easier to assign wall base to rooms and transition to doors. (The higher the number, the farther away your mouse can be to apply the linear product)
3. The print settings (Product Fully Opaque, Print Pattern As Pieces, Print Orignal Image) were moved to the Print Setting Window.
------------------------- Fixed bugs -------------------------
1. Self coving was not clipped by elevations on the floor.
2. It could not assign a linear product to a one-step stairway.
3. A window would not show up if it was closed in a disconnected monitor.
4. Other accumulated bugs and performance improvements.
2. Other improvements and minor bug fixes.
2. Fixed a bug in carpet layout. The cuts weren't duplicated correctly with the room if the Roll-Cut Option was "By Room".
3. Other improvements and minor bug fixes.
1. Added the Cloud tab next to the Worksheet tab.
1.1. Click on the Cloud tab to open your customer portal where you can manage the projects, product database, licenses, and subscriptions. You can also share your project with your co-worker over the cloud.
1.2. The Cloud tab can be turned off in File->System Settings->Advanced Tab->Cloud Tab->Uncheck the box.
1.3. The Cloud shortcut was added to the top-left quick access bar.
------------------------- Image Import -------------------------
2. The product texture image becomes transparent if there is a background floorplan image, and if you toggle on the “Image Overlay” option under View Options.
3. When cropping an image from a floor plan at the “Import” Window, it will keep the scale of the original plan and apply it to the cropped image.
3.1 Notes: This feature only works when you select a blueprint or use “two-points” to scale a floor plan. If the original plan is scaled either horizontally or vertically, the program won't apply the original scale to the cropped image.
------------------------- Product -------------------------
4. Tile texture can be removed.
4.1. Right click on the tile->View Modify Details->Set Texture->Click “Clear” button on the top right.
5. Users can control the image resolution when uploading a product image to the product catalog.
5.1 Open a tile product from the product catalog->Set Texture.
5.2 At the lower-left corner of the pop-up window->you can select image size from the pull-down list.
6.Enhancements for the list view in Product Database.
6.1 It saves the previous position of the Product Window.
6.2 It saves the previously adjusted column widths of the Product Window.
------------------------- Estimation-------------------------
7. Shortcut to multiple product usages in the worksheet if estimate by layer/phase option is on. (A quick way to build proposals for apartment buildings)
7.1. At Takeoff tab, right click on the tab name->Edit Tab->Add *sign and the duplication number following the tab name. For example, the original tab name is Unit 101. To multiply the unit by 10, modify the tab name to Unit 101*10.
7.2. Estimate the project and select estimate by layer or by phase
7.3. Go to Worksheet tab->click New icon to create a worksheet->at the popup dialog box, select “By Area” as the style
7.4. Click on Export group result by layer/phase->group the results either by Floor or By area
7.5. The product usages will be multiplied by 10 on the exported results
8. Cap the waste ratio of add-ons of roll products, if the add-on “Calc Method” is set to “Product Usage”.
8.1 When estimating pattern carpet with a pad, if the waste of the carpet is over 20%. The program will “cap” the waste for associate carpet pad to 20% waste, saving carpet pad usages.
8.2 Go to File->system Settings->Advanced Tab->The default Roll Add-on Waste Cap is set to 20%
------------------------- Worksheet -------------------------
9. If the project is estimated by tab/phase, users can select desired tabs/phases before creating a worksheet.
9.1 Estimate project by tab/phase->Worksheet Tab->New->it prompts to select which tabs->check on desired tabs->select worksheet type
10. User can apply Use Tax to the costs in the worksheet.
10.1 Open worksheet and find Use Tax check box in the right panel. If the Use Tax box is selected, it will apply the tax rate to the cost price instead of sales price.
------------------------- Print Options-------------------------
11. Use the up/down arrow key in Print Options to reorder sections in the printout.
11.1 File->Print->Find Options tab where section names are listed, such as Project Summaries, Forms, Diagrams, etc.
11.2 On the right of the section name, find the arrow keys.
11.3 Click on the arrow to adjust the sequence of each section appearing on the printout.
----------------Miscellaneous --------------
12. Right click on the Quick Access Toolbar on top of the window to "Reorder Quick Access Toolbar"
13. Display currency amount using the accounting number format. 1234.56 => 1,234.56 14. Align numbers to the right in a worksheet.
----------------Critical Bug Fixing ----------------
1. It failed to duplicate add-on products whose add-on calc method was set to "Floor Area" in self-coved rooms.
1) Fixed a display error of the elevation walls in the 3D view.
2) In the diagram, when viewing walls, the walls of elevation are expanded "up" to the top. (The walls of the room are expanded "down" to the floor.)
-------------------------- Bug Fixings --------------------------
Fixed product add-on creating and deleting bugs.
Display of tile replacement was not correct in some cases.
Display of elevations with arc walls was not correct in the 3D view
1. "Print Original Image" under "Drawing Style" defaults to "off ".
- Previously, it is defaulted to "On" which caused long processing time when printing to a physical printer.
2. For tiles whose calc method is "Cut & Fit", the "Tile Waste Share" option defaults to "by room" and the "Waste Share Radius" value defaults to "60 feet".
- Previously, the default Tile Waste Share Option was "by tab"; the Waste Share Radius was "unlimited". In extreme cases, such settings would slow down the program estimation due to intensive computing.
-------------------------- Bug fixes --------------------------
1. After importing some PDFs to the Takeoff tab, the images were blurry.
2. Two memory leaking issues.
1. (Commercial Edition Only) Import CAD files and selectively toggle on/off layers to achieve desired results. To toggle on/off layers: (1) Method one: In the “Image Preview” window->select “Layers” icon on the top left corner;
(2) Method two: After importing a plan to the drawing area, you can right-click the image and select “Layers.” (Note: Check "Save CAD file with the project" at the "Image Preview" window )
2. (Commercial Edition Only) Changed default PDF-to-Image Converter
(1) Default to PDF-to-PNG converter when importing PDFs.
(2) If you want to convert PDF to Tiff file format, select “Tiff” from the pull-down list at “Select Images to Import” window.
(3) Improve the speed when loading PDFs to the "Select Images to Import" window. *** Tips for losing details after plans are imported *** To minimize the project file size, it defaults the image color format to monochrome (black & white). However, if you lose some details after converting images, such as textures of product or furniture, you can change the color format to grayscale to preserve the details.
------------------------- Enhanced 3D view -------------------------
3. 3D walkthrough method one: create a route and visualize it in 3D mode.
(1) On Takeoff Tab, click the “black triangle” icon next to the “3D View” icon, draw a desired walkthrough route in the 2D diagram.
(2) Double click on the route to open Property View panel where you can adjust walkthrough settings, such as speed, angle, altitude, whether or not to loop, etc.
(3) Click the 3D View icon again, under 3D View, click the “black triangle” under “Reset View”->select “Walkthrough Rout”->Play.
4. 3D walkthrough method two: interactive walkthrough
(1) Under 3D View, Click “View Position” button, drop the blue man to the desired position in a room.
(2) Use arrow keys and the mouse to move it around. Refer to the tooltip of “View Position” for more information.
5. Allow for assigning products when reviewing a floor plan in the 3D mode.
(1) Click to select an area ( a wall or a floor)
(2) Left-click the top right “triangle brackets” icon to expand the “Property View” panel where you can assign a product to the selected region.
6. Export 3D floor plan to a .3ds file (Autodesk 3DS Max file format) which can be imported to some interior design software.
(1) Click the "3D View" icon to review the floor plan in the 3D mode.
(2) Click "Export 3DS" icon to current 3D floor plan to .3DS file.
7. Review the staircase installation style in a 3D model.
(1) Select and apply a carpet install method to a staircase ( such as full warp, waterfall, etc.)
(2) Click the “3D View” icon; you can review the installation style in 3D.
8. If a room is flash coved, the extension of the flooring material will appear on walls in 3D views.
9. Create a sunken area on the floor using Elevation.
(1) Draw the sunken area on the floor using the Elevation tool.
(2) Double-click on it to pop the Property View panel.
(3) Enter the height of elevation and check “Is Recess” box.
(4) Review the floor plan with a sunken area in 3D view. ** Tips: create a recessed area on another elevation** You can also create a recessed area on top of another elevation object to create objects such as sinks or tubs.
10. Provide a list of standard 3D views, such as Front, Back, Top, etc..
(1) In the 3D mode, click the “black triangle” icon under “Reset View.”
11. Improved the speed when displaying randomized tile pattern with tile texture image in both 2D and 3D models.
------------------------- Printing -------------------------
12.Improved image clarity when printing to PDFs or through a physical printer.
(1) By default, it automatically fits the original image to the selected paper size. **Tips for long processing time** It may take a few minutes to render a large image when printing to a physical printer.
13. To print compressed image to a physical printer to reduce the processing time, go to File Menu->System Settings-> Drawing Style->deselect “Print Original Image.” -
------------------------- Product conflict checker -------------------------
14. If it detects product conflicts, the yellow “exclamation” icon will light up on the top right of the project item list panel. Click on it to review the conflicting products.
15. Click on the black triangle icon next to the exclamation icon, and you can decide which types of conflicts you want to pay attention to and ignore others.
------------------------- Compatibilities -------------------------
16. In the next release, it will use .NET framework 4.6.2 which does not support Window Vista OS.
------------------------- Bug Fixes -------------------------
1. If a count Item was associated with a roll product, and if the roll product was applied to a self coved room, the count item was not calculated correctly.
2. If a tile had been manually cut using the “Saw” tool in tile pattern designer, the tile estimation was incorrect.
3. When splitting rooms by dividers, sometimes it created triangular rooms.
4. Failed to assign grout product when applying pre-defined tile patterns to rooms. 6. Fixed some memory leaking.
2) Added "Tile Position Dimension" under View Option menu, which is off by default.
1. "Additional Waste" and "Minimum Waste" Properties.
-These are enabled when creating a tile in the product database (Hover your mouse over the property name to see the details).
(1) Provide more ways to adjust tile waste
(2) Add additional waste to allow for additional stock
(3) Add minimum waste to ensure safe and sound quantity
(4) Adjust the tiny pieces size for tiles to be ignored
(5) Allow tile rotation based on best fit
(6) Adjust max cut times for each tile
(7) Add cut margin around a tile
(8) Adjust tile waste sharing scope
**Note: You will see those two fields only if you select the "Cut and Fit" or "Half Reuse" or "No Reuse" calculation method.
2. Project-Level Tile Estimation Settings Panel.
- Select a room with tiles in the diagram, click on the estimation setting icon ( the wheel icon) and then select the “Cut and Fit” calculation method. Then tile calculation settings will then appear. Hover your mouse over the parameters to see detailed explanations.
3. System-Level Tile Calculation Settings.
- When you create a new project, the program will use the default tile estimation settings. Tile Pattern Enhancements:
4. We added popular luxury carpet tile patterns and wood-look patterns to the tile pattern library, such as scale, wave, chevron.
5. You can change tile sizes on the fly when applying the pre-defined tile pattern.
**Note: When assigning a pre-defined tile pattern to the diagram, click the “Resize” button and enter the tile size. The program will automatically resize the rest of the tiles formed with the tile pattern.
6. We included shortcuts to speed up pattern creations in the tile pattern designer tool. To use this feature, press the R key to rotate a tile and then hold down the Ctrl key to flood-replace the tiles.
7. In the tile designer tool, you can now select a tile offset from the pull-down list (such as ½). It snaps to the selected offset when you move one tile along the edge of another.
8. We added a tile corner cutter (the saw icon) to allow for creating chevron-shaped tiles in the tile designer tool.
9. The software now has a “Divide by tile replacement” function to provide an alternative way of dividing a room into two areas with different tile products.
- Apply tile A in the diagram by right clicking on tile B and then select “Replace tile in the diagram.” After this, you will select the tiles to be replaced by tile B to the Divider function on the ribbon by selecting “Divide by tile replacement”
10. Show reference distance when selecting pattern position starting point.
-When selecting tile pattern position, it displays the dimensions from the nearest walls. (View Option->Pattern Position).
UI and Display Enhancements:
11. You can adjust the icon size of patterns/product to show more or fewer icons in the product database, project item list or pattern library.
12. You can represent a product using hatch texture in the product database, in the diagram, and in product legend.
(1) Select a hatch texture to represent a product in the product database.
(2) In the view option, select Product Hatch to show a tile pattern in Hatch texture in the drawing and the product legend.
(3) Optionally, you can combine “Product Hatch” with “Tile piece hatch” and/or “Hatch as black” to achieve the desired results.
13. You can now display a tile texture image in the legend (View option->Tile texture).
14. The software can now adjust the linear product style from dashed line to solid color line ( System Settings->Drawing Style tab->Linear Style.)
15. You can annotate layers with takeoffs.
-Click the blank triangle next to the green plus sign in the lower left of the drawing canvas. If the floor has been taken off, you will see a blue icon in front of the layer name.
Takeoff Enhancements:
16. We have added a shortcut to create stage & auditorium design using Elevations.
-Takeoff tab->Draw an elevation->Left-click on it->select Room Edit function on the ribbon->select “Create Stage”. You can create an arena stage or church stage in seconds.
17. We also have an advanced legend and notes features. You can enable to show the tile texture in a legend, provide individual legends for rooms and walls, and add legends and notes to walls.
18. We have shortcuts to create circular holes/elevations (press the R key once and use Rectangular Room or Elevation or Hole to create a circular shape).
19. You can now snap to quarter or half circle when dragging an edge.
- When dragging an edge to create a curve using the “Arc” function, it highlights the curvature when it can form a perfect quarter or half circle.
2. Bug fixes.
2. Allow matching hardwood pattern at the doorway (Press CTRL key and left click to multi-select rooms, right click ->Layout & Seam->Set Pattern Position)
3. Improved performance of floor divider. Note: it is highly recommended to use "Split Room By Region" under "RmEdit" to takeoff complicate floor plans to achieve stable results. Split rooms have less interference with each other compared with divided floor regions. 4. Allow creating a floor divider from a wall to a hole in the same floor.
5. Improve the display of dimension by adding extra space between text and line.
6. Updated privacy policy in the license agreement.
7. Bug fixes.
1. Allow multi-selection in same room (Hold Ctrl key + left click).
2. Add shortcuts to scroll drawings:
- Ctrl + scroll mouse wheel to scroll drawings vertically;
- Shift + scroll mouse wheel to scroll drawings horizontally;
3. Allow draw floor dividers cross existing dividers.
4. Right click on a room with floor dividers -> select “Select Same Product Dividers” to highlight divided regions in a single room with the same flooring materials so that user can change layout direction for the product in multiple divided regions in one shot.
------------- Product -------------
5. “Estimating Length” when create roll goods to allow user to accommodate uneven cuts at end of each roll.
6. Option to apply linear product to grout joints of a tile pattern and calculate its usage. (An efficient way to calculate heat welding usage for vinyl patterns. Accessible if right-click on a tile pattern in the project item list -> Grout Product pull-down list -> Select linear product as grout)
7. "Tile Shape in Legend" option in the sub-menu of Legends to allow toggling on/off tile shape in product legends.
8. "Quick Tile" - When drag a tile pattern to a room, find "Quick Assign" button at bottom of the Assign Tile Pattern window. You can assign patterns to the room without selecting tiles from pull-down list.
-------------- Estimating --------------
9. Change layout directions for rooms in one-shot, including both roll goods & hard surfaces. (Room Edit->Layout & stem->Apply layout/seam to…)
10. Rotate cut on cut sheet by 180 degree. (Right-click on a cut to see this option)
-------------- Worksheet --------------
11. Worksheet->Reload section->Merge->Merge/Un-merge add-ons with primary flooring materials in one single line item on the worksheet and proposal.
12. Lock items in worksheet to prevent them from being removed when reloading from estimation data.
13. When loading the estimation data to worksheet, keep ordering of products the same as in the project item list.
14. Drag & drop items in worksheet to reorder them.
---------- Printing ----------
15. Display floor/room duplication in both worksheet and in the proposal.
16. Support multi-languages in print template.
17. Option to display product legend with wall view when printing (Print->Room Detail->Room Detail Walls & Settings->Wall Detail Legend)
----------- System -----------
18. Add "Min Pattern Drawing" under System Setting -> Drawing Style, to avoid drawing tile/pattern grids that are smaller than the set value.
19. File back up and Project save reminder
- File -> Backup Projects tab -> find previously saved backup files.
- File -> Backup Projects tab -> click the Wheel Icon (Setting) -> prompt saving every x minutes)
20. One click to import existing Measure Square 2015 project files to M2 Cloud.
- File -> Cloud Projects tab -> click the black triangle icon -> select Import. (Press Ctrl/Shift key to select multiple files in open file dialog.)
1. Preview thumbnails of blueprints when importing multiple pages.
2. Import blueprints with customized resolution.
3. Set up scale using two points while previewing images; apply scale captured by two points to multiple pages.
4. Verify scale using ruler command while preview images.
-Product Schedule
5. Add shortcuts to facilitate product schedules.
6. Right click on Project Items or Product/Services folder -> find shortcuts on top right, such as add, delete, duplicate, etc.
7. Import product templates created in M2 2015 version to the project item list.
- Right click on Project Items->Import/Export->Import Measure Square 2015 product template.
- Takeoff
8. Organize rooms by installation phases.
- From room RmEdit->Phase->create phases->tag selected rooms to phases
9. Create rooms with default product
- Draw a room with a product->select the product from Estimate pull-down list->continue room creating.
10. Allow creating floor divider from middle of the room
11. Create product legend with/without product usage and display legend; manually place product legend on the diagram
12. Delete multiple layers in one shot (right click on a tab ->Select tabs to delete)
- Product assignment
13. Allow creating randomized tile pattern with multiple tiles specified percentages.
- Create several tiles with the same dimensions.
- Apply one tile to a room->right click on the Tiling from project item list->view modify->click Edit to set random tiles
- Click Add to add tiles to the list->select tiles from pull-down list and specify percentage->OK.
14. Align tiles continuously on walls - Draw a room->View Wall->apply a tile on wall->right click on the wall->select Wall tile continuous to right/left.
15. Set self-cove multiple room by one-shot (right click on a product under Project Items ->Set self-cove).
16. Set self-cove for all walls or selected walls of rooms
- Right click on a room->Rm Edit->Set self-cove.
- Turn on View Wall->hold down Ctrl key and left click to highlight several walls.
- Right click on one of selected walls-> Self cove selected walls.
- Estimation
17. Support estimating by installation phases.
18. Grout coverage chart
- Create a product from project item list-> select grout as product type
- Look at product details->find Grout Coverage Chart->specify the grout width and coverage chart provided by manufacturer.
- After apply tile to a room->right click on tiling->view modify->specify grout product and grout width. The program will automatically compute it by bag or by weight.
19. Calculate tiles in three methods ( waste ratio, cut & fit, and reuse 50%)
20. Support roll allocation
21. Round up roll cuts to nearest 3", 6", 1'
22. Stagger cuts for large open area such as basketball court - Worksheet
23. Ability to group items on worksheet - Right click on the title of the table->select Group.
- Bidding package
24. User can export data to a pre-programmed excel bidding package ( by request)
- Print
25. Users can change View Options and Print Options while previewing the printout - Enhanced 3D display
26. From View 3D->Options->toggle on/off different options to adjust the 3D display)
- Added Transparent Wall to allow view product assignment clearly (When it is on, the materials on the wall will be seen through )
- Options to display room dimensions, wall stack height, tile texture, tile pattern positions in 3D view
- General Settings
27. Export select taps as a project/import selected tabs into current project
28. Allow open 2nd sessions to open two projects at the same time.
- Collaborations with your team
29. Open projects created on iPad or Android phone on PC
30. Sync settings & product database with your co-worker
31. Admin can protect database & settings by marking them as "read-only" for team members
1. Improved stability with large project drawings
2. Fixed count add-on item estimating issue at room duplication
3. Minor bugs fixes
----------------------------------------------------
Product database:
1. associate EA item as base product add-on
2. add additional waste % for tile product
3. add Estimating width for roll goods (so it can be set less than regular width)
Product Assignment:
1. linear item will set wall base width when assigned
2. calculate base perimeter addon when floor is self coved Estimating:
1. show progress bar for larger project estimating (when in auto estimating mode) so use can cancel it if needed Worksheet:
1) provided worksheet summary export option, project file name is included in the exported file
2) save worksheet column settings for all worksheet types (right click on worksheet column -> select columns -> check "Save for future...")
System Setting:
1. auto project check and fix feature at project open (can be turned off at System Setting under Advanced tab)
Printing:
1. toggle on/off usage in estimating summary report
2. print diagram in center rather than on top, if "Merge Pages if possible" is not selected. General and GUI:
1) run second instance of MeasureSquare on the same PC (from File Menu), can copy/paste across two projects
2) Press F1 for help on ribbon tooltip
3) future update download and install will be more smoothly
Bugs fixed:
1. add-on product gets duplicated after modification on parent product.
2. duplicated project products crash product legend drawing.
3. a few others
1. User can customize product type. (Click “+” icon to add new product, and then the wheel icon)
2. User can set up markup/profile margin by folder in product collection window (access it from the little black triangle on toolbar)
3. User can setup markup/profit margin at product level
4. Added “estimating width” for roll goods
5. Added “ No reuse” Calc Method
6. Auto-calculate boxed sales/cost price in product window (Click “sell by” and then click pull-down list for box sales/cost pricing)
7. Allow associate Count item with primary flooring material. i.e. associate corner guard with tiling
8. Added “Check all” and “ Uncheck all” options in right-click context menu for “Taxable” and “By Box” column in product list view in product collection window
9. User can sort product list alphabetically in product collection window Drawing:
10. Added "Auto-scroll" in freedraw mode ( click Alignment tab to turn it on/off)
11. Added "Image IntelliSense" option in freedraw mode, which will automatically detect corners and lines on blueprint ( click Alignment tab to turn it on/off)
12. From right-click context menu, use can paste objects mirrored by x axis or y axis
13. Right click on a wall->to delete wall
14. Add product legend with/without quantities on the diagram (access it from Note ->submenu)
15. Draw room with default product ( select a product from the estimation pull-down list and then draw rooms) Estimation
16. Select self-coving for multiple rooms by right-click on a roll good under project item list->set self-coving
17. Added “Roll cut by room” when estimating roll good
18. Added “Re-layout” command on ribbon and cut view context menu to reset cuts on the cut sheet
19. Added “Move roll cut to the front/end” options ( from right-click context menu on cut sheet)
20. Added “Consolidate waste” option ( from right-click context menu on cut sheet) Display
21. Show distance from current location to walls while adding T seam
22. Option to show/hide self-coving in the diagram
23. Hide product in other layers if estimate by layer is selected. (right click on project product when estimate by layer) Printing:
24. Added “Print current view” option
25. Added “View option” to the menu bar. User can toggle on/off view options while previewing the report
26. Added options to show/hide “ Linear length”, “ Base perimeter”, ”Seam length” or “ Waste” column in the estimation summary page.
Worksheet:
27. Added “ Markup” command on the ribbon
28. Added base perimeter column System
29. Right-click on an command to add it to the quick access tool bar
1. To display product assignment under each room label (Takeoff tab->options->check on “Product list under label”
2. To Replace an existing product with another, right-click on a product under “Project List”-> replace and select another flooring material
3. Self-cove roll goods for selected rooms in one shot
- Left click on a roll good under project item->select room applied
- Takeoff tab->Room Edit->Self-cove->enter desired self-coving size.
4. Estimate direction control
- Takeoff tab->left click a room with roll goods->click the black triangle next to estimation settings->Estimate Direction Control-> select “ Keep neither locked seam nor layout direction”
-The program will allow users to use the “horizontal estimate” & “ Vertical estimate” commands for all rooms, after users manually move the seams of each individual room
Bug:
1. Incorrect quantities of LF products associated with primary flooring mateiral
- File menu->System Setting->Advanced-> Check “ Examine after open”
- Whenever M2 detects an old project, it will screen to find incompatibility issues.
2. Other minor bugs
2. Added right-click menu shortcuts for room/wall/door editing.
3. Support linear product association with primary flooring material.
4. Cutting algorithm improvements 5. bugfixes
Related Articles
Release Notes for MeasureSquare 8
For the latest updates visit the weblink below. https://cloud.measuresquare.com/releasehistory 1.0.11.7587 ------------------------- UI Improvement ------------------------- 1. Enhanced the Project Items, it now shows Net Area, Cost Amt, Sales Amt, ...iPad Release Notes for MeasureSquare Mobile
Summary of MeasureSquare Mobile for iPad release notes Click here to see full version history Version: 2.4.7 Features: 1. Grid View. You can now turn on/off the Grid view by tapping the icon on the top left corner of the screen. 2. Layout of the ...iPad Release Notes for MeasureSquare Mobile
Summary of MeasureSquare Mobile for iPad release notes Click here to see full version history Version: 2.4.7 Features: 1. Grid View. You can now turn on/off the Grid view by tapping the icon on the top left corner of the screen. 2. Layout of the ...How Do I Add Notes and Handwriting in MeasureSquare 8?
In this video will cover how to add a legend, notes and handwritten notes to our diagram in MeasureSquare 8 For all versions of Desktop MeasureSquare 8How do I enlarge my Notes in MeasureSquare 8?
This article will show you how to enlarge the notes on your diagram in MeasureSquare8. This article applies to all measuresquare8 Version: All builds of MeasureSquare 8 Step 1: Click on the Note application. Step 2: In the Note Settings window click ...